
Quick links: Miner Yammer App, Analytics Engine Yammer App, Installation, Updating
The following steps are required to completely configure our on-premise SWOOP Miner.
Prerequisites
In order to provide you with the credentials we will require a mobile (or SMS friendly) number to send you an encryption key. Please provide this when requesting the installation script described below.
1. Viva Engage Application Creation for Miner
In order for the miner to operate, it must have a connection to the relevant Viva Engage Network via a Viva Engage Application.
To create a Viva Engage application:
-
Login as a verified administrator.
-
Select 'Register New App'. Fill in all fields with sensible value (they will only been seen by the data miner operator). The 'Redirect URI' must be set the home page URL for the miner web server and must be 'https'.
2. Viva Engage Application Creation for Analytics Engine
In order for the user to log into SWOOP, an additional app needs to be created for end-user authentication.
To create a Viva Engage application:
-
Login as a verified administrator.
-
Select 'Register New App'. Fill in all fields with sensible value (they will only been seen by the data miner operator). The 'Redirect URI' must be set to 'https://yourname.swoopanalytics.com'
-
Click on the 'Basic' info for App end enter 'https://yourname.swoopanalytics.com' into Javascript Origins where 'yourname' is your allocated swoop analytics domain.
Please provide the Client ID and your Viva Engage Network (normally your corporate domain name) to us via a support ticket. For security reasons do not include the 'Client Secret'.
3. Analytics Engine Instance Creation (SWOOP)
4. General Miner Installation
System Requirements:
- 10 GB Server Disk
- 50 GB Data Disk (script required /dev/sdb).
- RHEL Linux 8, AWS Linux or CentOS 8
- 2 GBytes Memory
- CPU Requirements: Any modern processor - do not use CPU throttled VM servers (eg AWS TX instance type).
- Access to Viva Engage API Servers (can be via proxy server)
- Host name for server
- SSL Configured on server
We will provide you with a script to configure the instance. The script may be used as a Cloud-init script or run under 'root' after the operating system is installed. If you are using AWS EC2 while configuring the instance upload or copy paste the script to 'User Data' (under 'Advanced Details') in 'Step 3: Configure Instance Details'. For other cloud-based environments (e.g. Azure) refer to their documentation.
This script has a number of parameters at the top of the file which must be filled in. You will need to provide values as per below:
|
Configuration Parameter |
Value |
|
NAME |
Your allocated SWOOP Analytics domain name (typically https://[clientname].swoopanalytics.com) |
|
CLIENT_ID |
Viva Engage application 'Client ID' that has permission to access network. This is also needed by the SWOOP Analytics Engine for access to the Javascript API |
|
CLIENT_SECRET |
Matching secret for ClientID above. Only used for miner. |
|
REDIRECT |
URL to your server. This must also be configured as your 'Expected Redirect' for the Viva Engage Application identified by the 'Client ID'. This must include 'https:'. |
|
PROXY |
Blank for none or host and address for HTTPS proxy in format 'host:port'. |
| OS | Either 'AWSLINUX', 'RHEL' (for Redhat Enterprise 7), 'RHEL8' (Redhat Enterprise 8) or 'OTHER' if you want to try your luck (must support yum). |
| PASSPHRASE | A passphrase provided separately to decode the content contained in the script. Please Note: The code provided contains the credentials to update the SWOOP Analytics server. Keep it secure. |
This script is design to work as a cloud init script but may also be run as user root as an install script. When you run the script it will perform the following action (see comments in script):
- Install package groups to support application ('Web Server' and 'PHP Support')
- Configure PHP
- Install files necessary to run the application
- Install log rotator for miner
- Install miner configuration file
- Install miner scheduler (runs hourly)
- Install miner code downloader in web server.
These options can be changed by editing the '/var/www/html/config.php' at a later stage.
You may like to allocate a separate mount point (on separate disk) for the miner data (so you can snapshot and restore separately). All the data is stored by default in '/data' for AWSLINUX and '/var/www/storage' for RHEL.
Please also change firewall settings (for network and machine) to allow access to the web server on your server (e.g. for RHEL firewall-cmd --zone=public --permanent --add-service=http;firewall-cmd --reload ).
Miner Installation for AWS Linux
These instruction describe the critical configuration required to spin up the miner in AWS:
- Launch a new instance in AWS using the 'Amazon Linux' 64 bit AMI - Next.
- Selection instance size (minimum t.2small) - Next.
- On step '3' copy/paste (or upload) the completed (with configuration parameters filled in) installation script into 'User Data' - Next
- On step '4' add a new volume on device '/dev/sdb'. This will become your data disk. - Next
- Complete the rest of the process as required.
Once the miner has spun up you can look at /var/log/cloud-init-output.log to determine progress.
Miner SSL configuration
Viva Engage requires that the SSL be configured on the miner to support authentication.
There are two options:
- Rely on the certificates (self signed) installed on the server and ignore the errors you get in the browser.
- Install your own certificates base on the host name.
In the case of option 2 you will need to add the certificates to the server. The relevant files are as follows:
- SSL configuration file - /etc/httpd/conf.d/ssl.conf
- Certificate key file - /etc/pki/tls/private/localhost.key
- Certificate file - /etc/pki/tls/certs/localhost.crt
- CA Bundle file - /etc/pki/tls/certs/ca-bundle.crt
All the files are in PEM format and the certificate key file should not be password protected.
If you are using the 'CA Bundle file' you will need to uncomment it out in '/etc/httpd/conf.d/ssl.conf' by removing the '#' (i.e. change '#SSLCACertificateFile /etc/pki/tls/certs/ca-bundle.crt' to 'SSLCACertificateFile /etc/pki/tls/certs/ca-bundle.crt').
Firewall Configuration
To report mining progress and check for maintenance tasks, the miner will need to be given outgoing access to port 8443 and the domain admin.swoopanalytics.com.
Miner Operation
Once you have installed the script you will need to login with a Viva Engage user that has network admin permissions. This should be a dedicated account for the miner as it may affect the users' day-to-day operation of Viva Engage.
To do this, start up the root page by going to the 'REDIRECT' Url from above.
This will:
- Download the latest version of the Viva Engage miner from the SWOOP Analytics engine (this is transparent). If your proxy is not configured properly you will find out here.
- Request permissions for access to Viva Engage.
- Test the Viva Engage connection and display a message that updates can proceed.
Updates will then be scheduled on an hourly basis and no other action is required.
Enabling and Configuring Sentiment and Keyword Analysis
Enabling Sentiment Analysis
If your SWOOP subscription includes sentiment analysis, then add the following configuration for the miner by editing the '/var/www/html/config.php' file:
$config->SentimentEnabled = 'Yes';
$config->SentimentAPI = 'https://<generated>.cognitiveservices.azure.com/text/analytics/v3.0/sentiment';
$config->SentimentAPISubscription ='<32 character subscription key>';
Obtain Azure Cognitive Services '32 Character Subscription Key' via the Microsoft Azure Portal. Click on "Show Access Keys" and then look at the hex value in "Key1".
Enabling Keyword Analysis
If your SWOOP subscription includes keyword analysis, then add the following configuration for the miner by editing the '/var/www/html/config.php' file:
$config->KeywordsEnabled = 'Yes';
$config->KeywordsAPI = 'https://<generated>.cognitiveservices.azure.com/text/analytics/v3.0/keyPhrases';
$config->KeywordsAPISubscription = "<32 character subscription key>";
Obtain Azure Cognitive Services '32 Character Subscription Key' via the Microsoft Azure Portal. Click on "Show Access Keys" and then look at the hex value in "Key1".
...php index.php --sentiment "Alexander of Macedon, and he that dressed his mules, when once dead both came to one.
php index.php --keyword "Alexander of Macedon, and he that dressed his mules, when once dead both came to one.
5. Updating the Miner
Please select one of the options below depending on convenience:
Option 1 - Configuring automatic updates (recommended)
Tick the checkbox under Update Option and then click Save Changes.
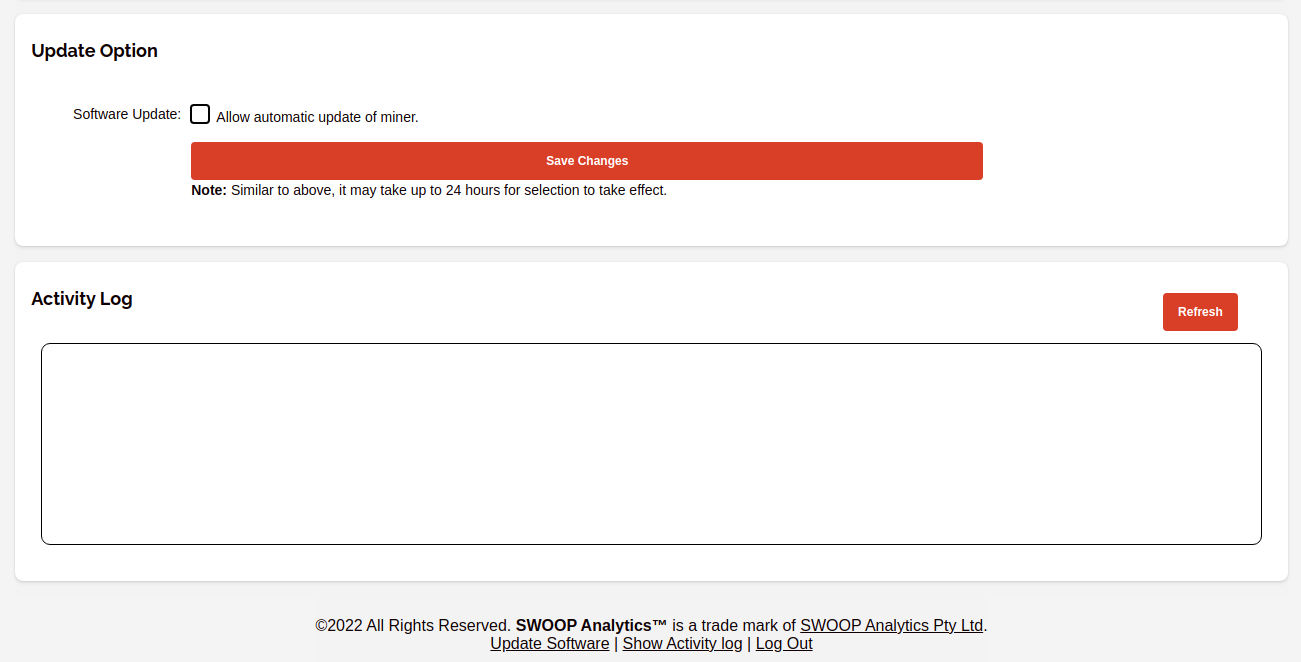
If the above Update Option doesn't exist then your miner may be too old and need to be updated manually before automatic updates can be configured.
Option 2 - Via the web browser
The miner can be updated by logging on to the miner and clicking the 'Update Software':
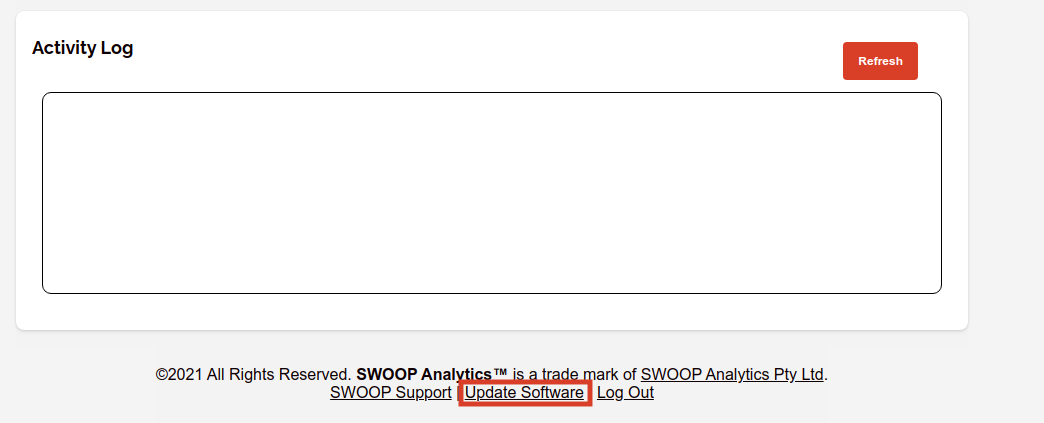
The new version of the miner will be shown when the screen refreshes.
Option 3 - Via the server console or ssh
If you are on the server console the miner can be updated with the following sequence of commands:
sudo su -s /bin/bash apachecd /var/www/htmlgrep 'define.*MINER_VERSION' index.phpphp update_sig.phpgrep 'define.*MINER_VERSION' index.php |
The two 'grep's will show you the version number changing.
Making the URL to the Miner accessible in SWOOP
It can be very helpful for other Viva Engage or SWOOP admins to be able to access the miner, and it is possible to store the URL to the on-premise data miner within the SWOOP end-user interface. To do this follow these steps:
- Log on to SWOOP
- Click 'Admin' in the footer
- Click on the 'Miner' dashboard
- Update the URL
Note - only Viva Engage verified admins and SWOOP admins will be able to access the SWOOP data miner.